As everyone knows, I love the toys that allow me to go on fabulous adventures! I finally got around to selling two bikes this spring and am currently trying to sell a third, so I decided that it was time to rebuild my fleet with a little spice. I’ve been curious about recumbent bikes for a long time, and ridden one now and then but never enough to know them well. Over the last month or so I’ve done a lot of research and decided I wanted to try a CruzBike. While most recumbent bikes have long chains (pedals out in front, derailleurs on the rear wheel), CruzBikes are Front Wheel Drivel, thus maintaining a “normal” chain length. There are pro’s and con’s to this set up, but in all my research I decided the pro’s won. They have several models available and I really wanted the Quest, but couldn’t afford one so I settled for their intro bike, The Sofrider. I figure if I fall in love with it I’ll resell it next year and invest in the Quest!
The remainder of this post will be a review of my first impressions of the Sofrider, in hopes that it can be helpful to others thinking about getting a Cruzbike. Sorry to be a bore if this doesn’t interest you, but I found other peoples blog entries very helpful when deciding whether or not to buy this bike and want to add to the body of CruzBike reviews available to future Cruzers. Feel free to leave me a comment if you are in that situation and want any further information.
Since they don’t typically retail their bikes in stores, I ordered mine online. It arrived over the weekend and yesterday afternoon I set down to start assembling. I had some questions before ordering and ended up having to play phone-tag a bunch with the sales rep. When I finally did talk to him he had some helpful tid-bits, but I’d mostly already answered my own questions. It seems their reps are often out riding bikes and doing demo’s which is totally awesome but also means you can’t always get one on the phone in a timely manner. Not a big deal, but good to know if you have bike questions and are on a time-line.
Day 1: Assembly and First Ride
The first thing I noticed when I began working on my bike was that it came in a remarkably small box – which meant I had my work cut out for me! The CruzBike Quest, at $800 more than the Sofrider, is actually a folding bike which means it’s far easier to fly with. While the Sofrider is not considered a folding bike if you are determined you can clearly fold this one up pretty small too!

I pulled the pieces out of the box, which is about 2/3rds the size of a regular bike box. While it’s not a folding bike, it does come apart and fold up real small.
Assembling the Sofrider took me just shy of two hours, plus a bit of adjusting once I got riding. In general it was fairly easy to assemble and the directions that came with it were pretty thorough and easy to follow. It would be challenging for someone who didn’t have access to decent bike tools and a general understanding of how bikes work. There are also several YouTube videos of assembly which I found useful. There were a couple of spots that I got stuck based on the written directions and found the visuals of the YouTube Tutorials critical to progressing forward.
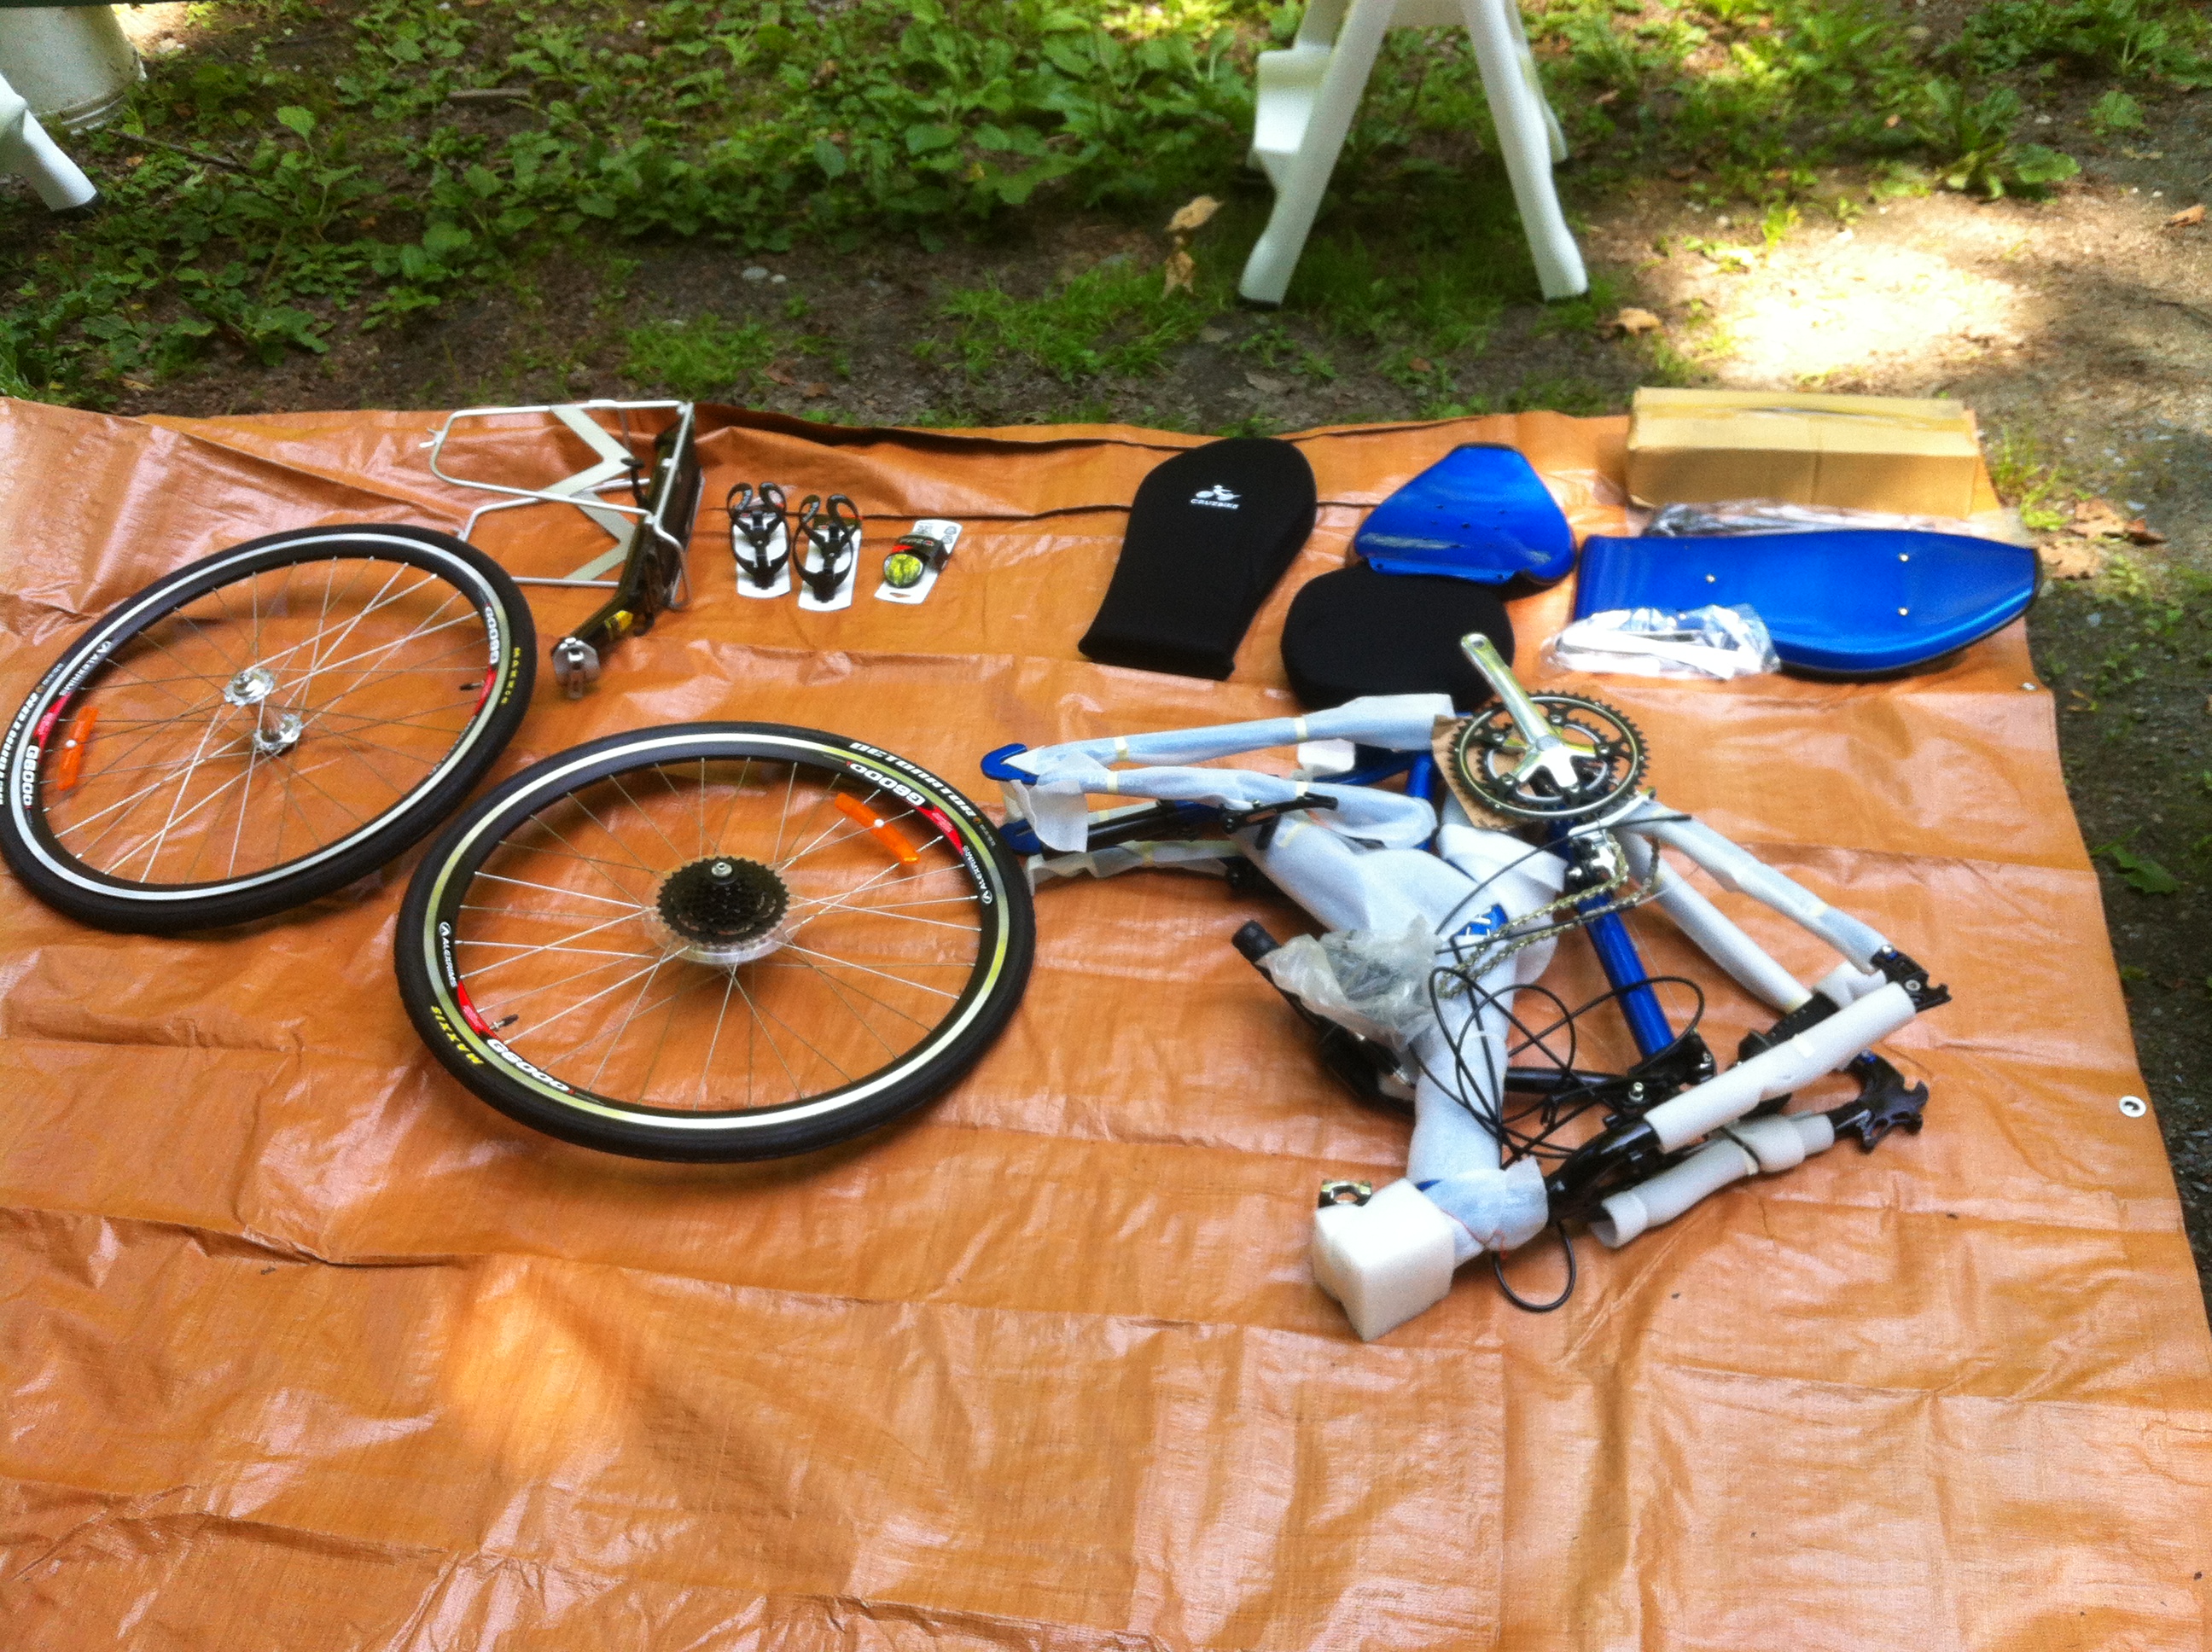
First step was to lay all the pieces out and figure out what was what.
Since the bike is built differently from a regular bike, the majority of the pieces look a little different than what you might expect. Even as someone with fairly proficient bike mechanic skills, reading the directions and looking at the pictures is critical! Interestingly, the instructional video online does the assembly in almost the reverse order as the instructions do, so clearly the order you do things is mostly irrelevant.

Starting to look a little like a bike….
The bike was very nicely packed and didn’t seem to sustain any damage other than a few tiny scratches during shipping. My only complaint was that both the online video and the printed directions show the rear derailleur as coming already mounted on the front fork and thus don’t give any directions for how to mount it. Mine came detached and in a plastic bag, which also meant the chain was incredibly tangled. I ended up having to use a Chain Breaker to take the chain completely off before I could figure out how to hang the derailleur and then re-thread the chain. Not a big deal, but it would have been easier with directions and might have been a bigger problem for someone who had never hung a derailleur before.
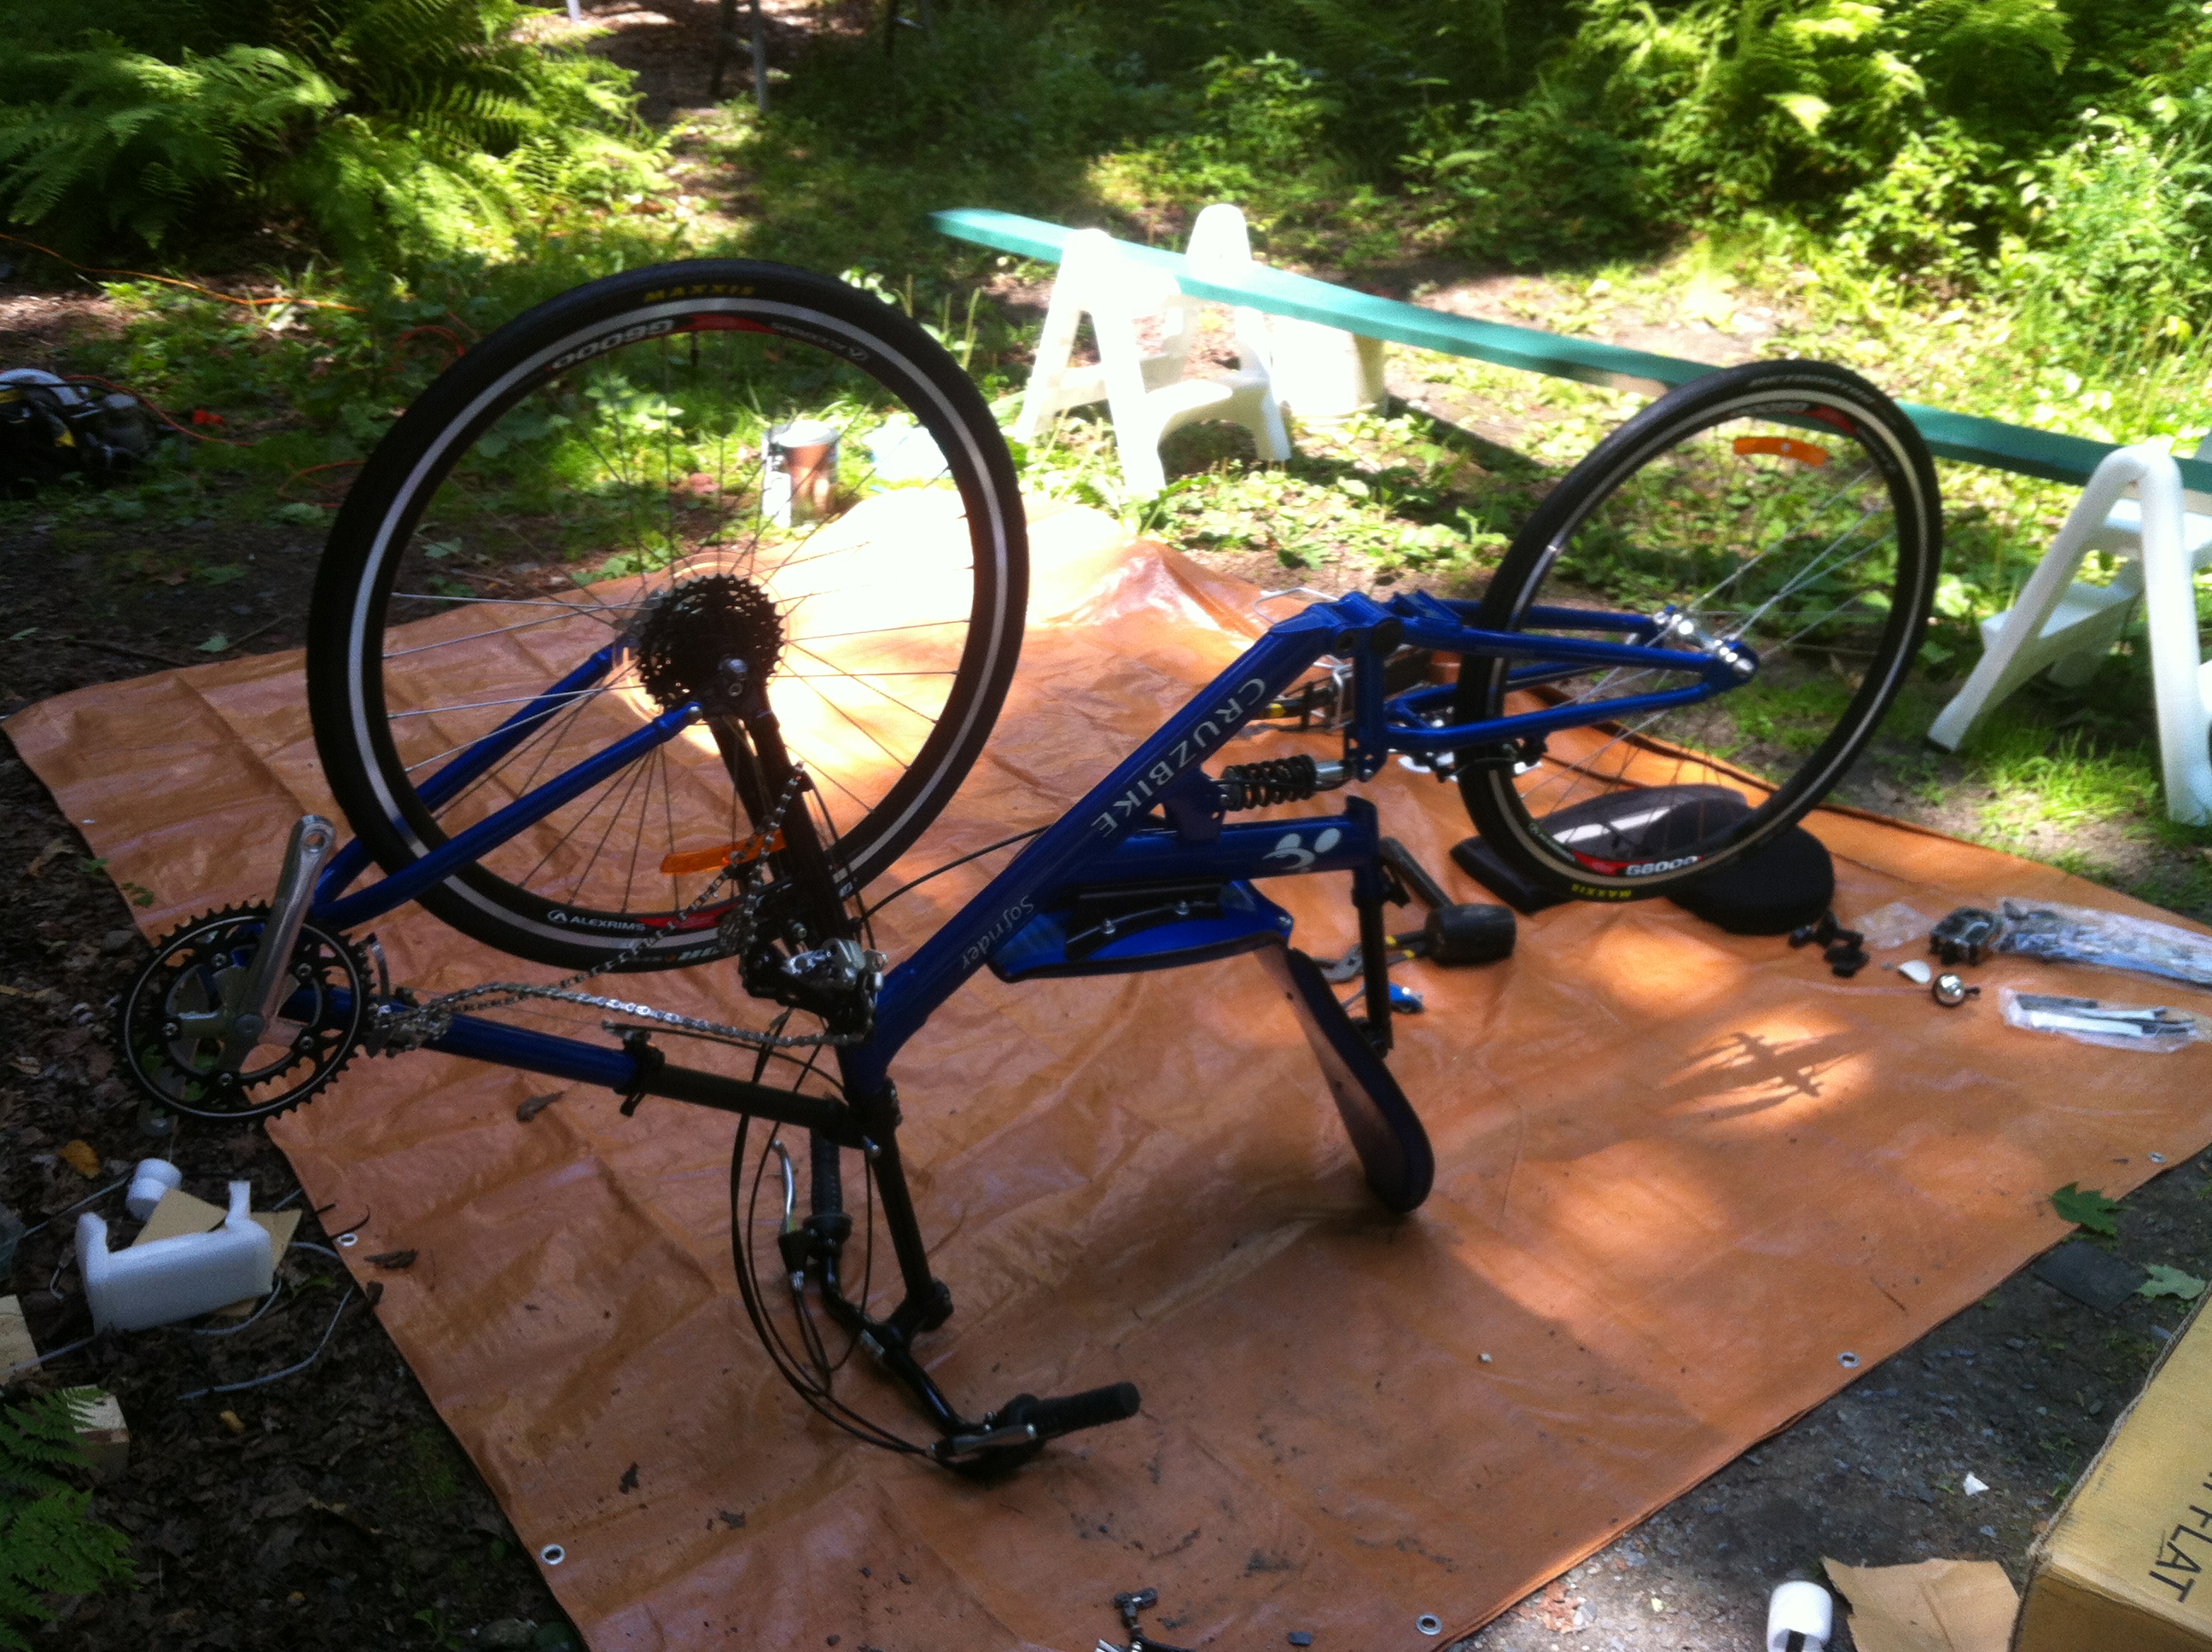
It’s turning into a bike, except everything is in the wrong place!
Oddly enough the bike came with two kickstands. I’m guessing this was a mistake on their part. What I didn’t notice is that they were actually two different length kick stands. I put the longer one on first and it is too long for the bike it simply doesn’t work. I have yet to switch to the shorter one, but I’m thinking that will work better.
Once I got the bike assembled and the brakes and derailleurs adjusted I was ready to ride. I’d read lots of reviews of people saying it’s like learning to ride a bike all over again, but I’d also seen YouTube videos of supposed first time riders who didn’t seem to have too much trouble, so I wasn’t that worried. Still, I put my helmet on just in case!
The first few rides were really really hard! It took several tries just to get my feet up on the pedals and I seriously wished I had training wheels. I spent the first half hour or so wobbling too and fro in my driveway. I found coasting down gentle hills with my feet just barely touching the pedals was very helpful, it enabled me to get the hang of the balance and the odd center of gravity before having to worry about pedaling and how pedaling affects steering.
Recumbent bikes are notoriously bad at climbing hills which is partly because you can’t stand up to have your body weight pushing on the pedals and partly because you lose power by having such a long chain. However, the Front Wheel Drive is theoretically supposed to correct both problems. The chain is the same length as a regular bike and while you can’t stand up you can sit forward a bit in the seat and pull on the opposite handle bar from the pedal you are pushing, which in essence uses your upper body weight to enhance the pedal stroke. It’s complicated and as hard as it sounds, but I can tell once you are good at it it’ll work.
So I wobbled around my driveway for about an hour, getting more comfortable learning to turn without falling and decided I was ready for the road. I only ended up in the wild raspberry bushes twice! I didn’t want to hit much traffic so I stuck to small dirt roads around Maple Corner. I ended up riding just shy of 10 miles, which I felt was pretty good for my first day on a CruzBike.
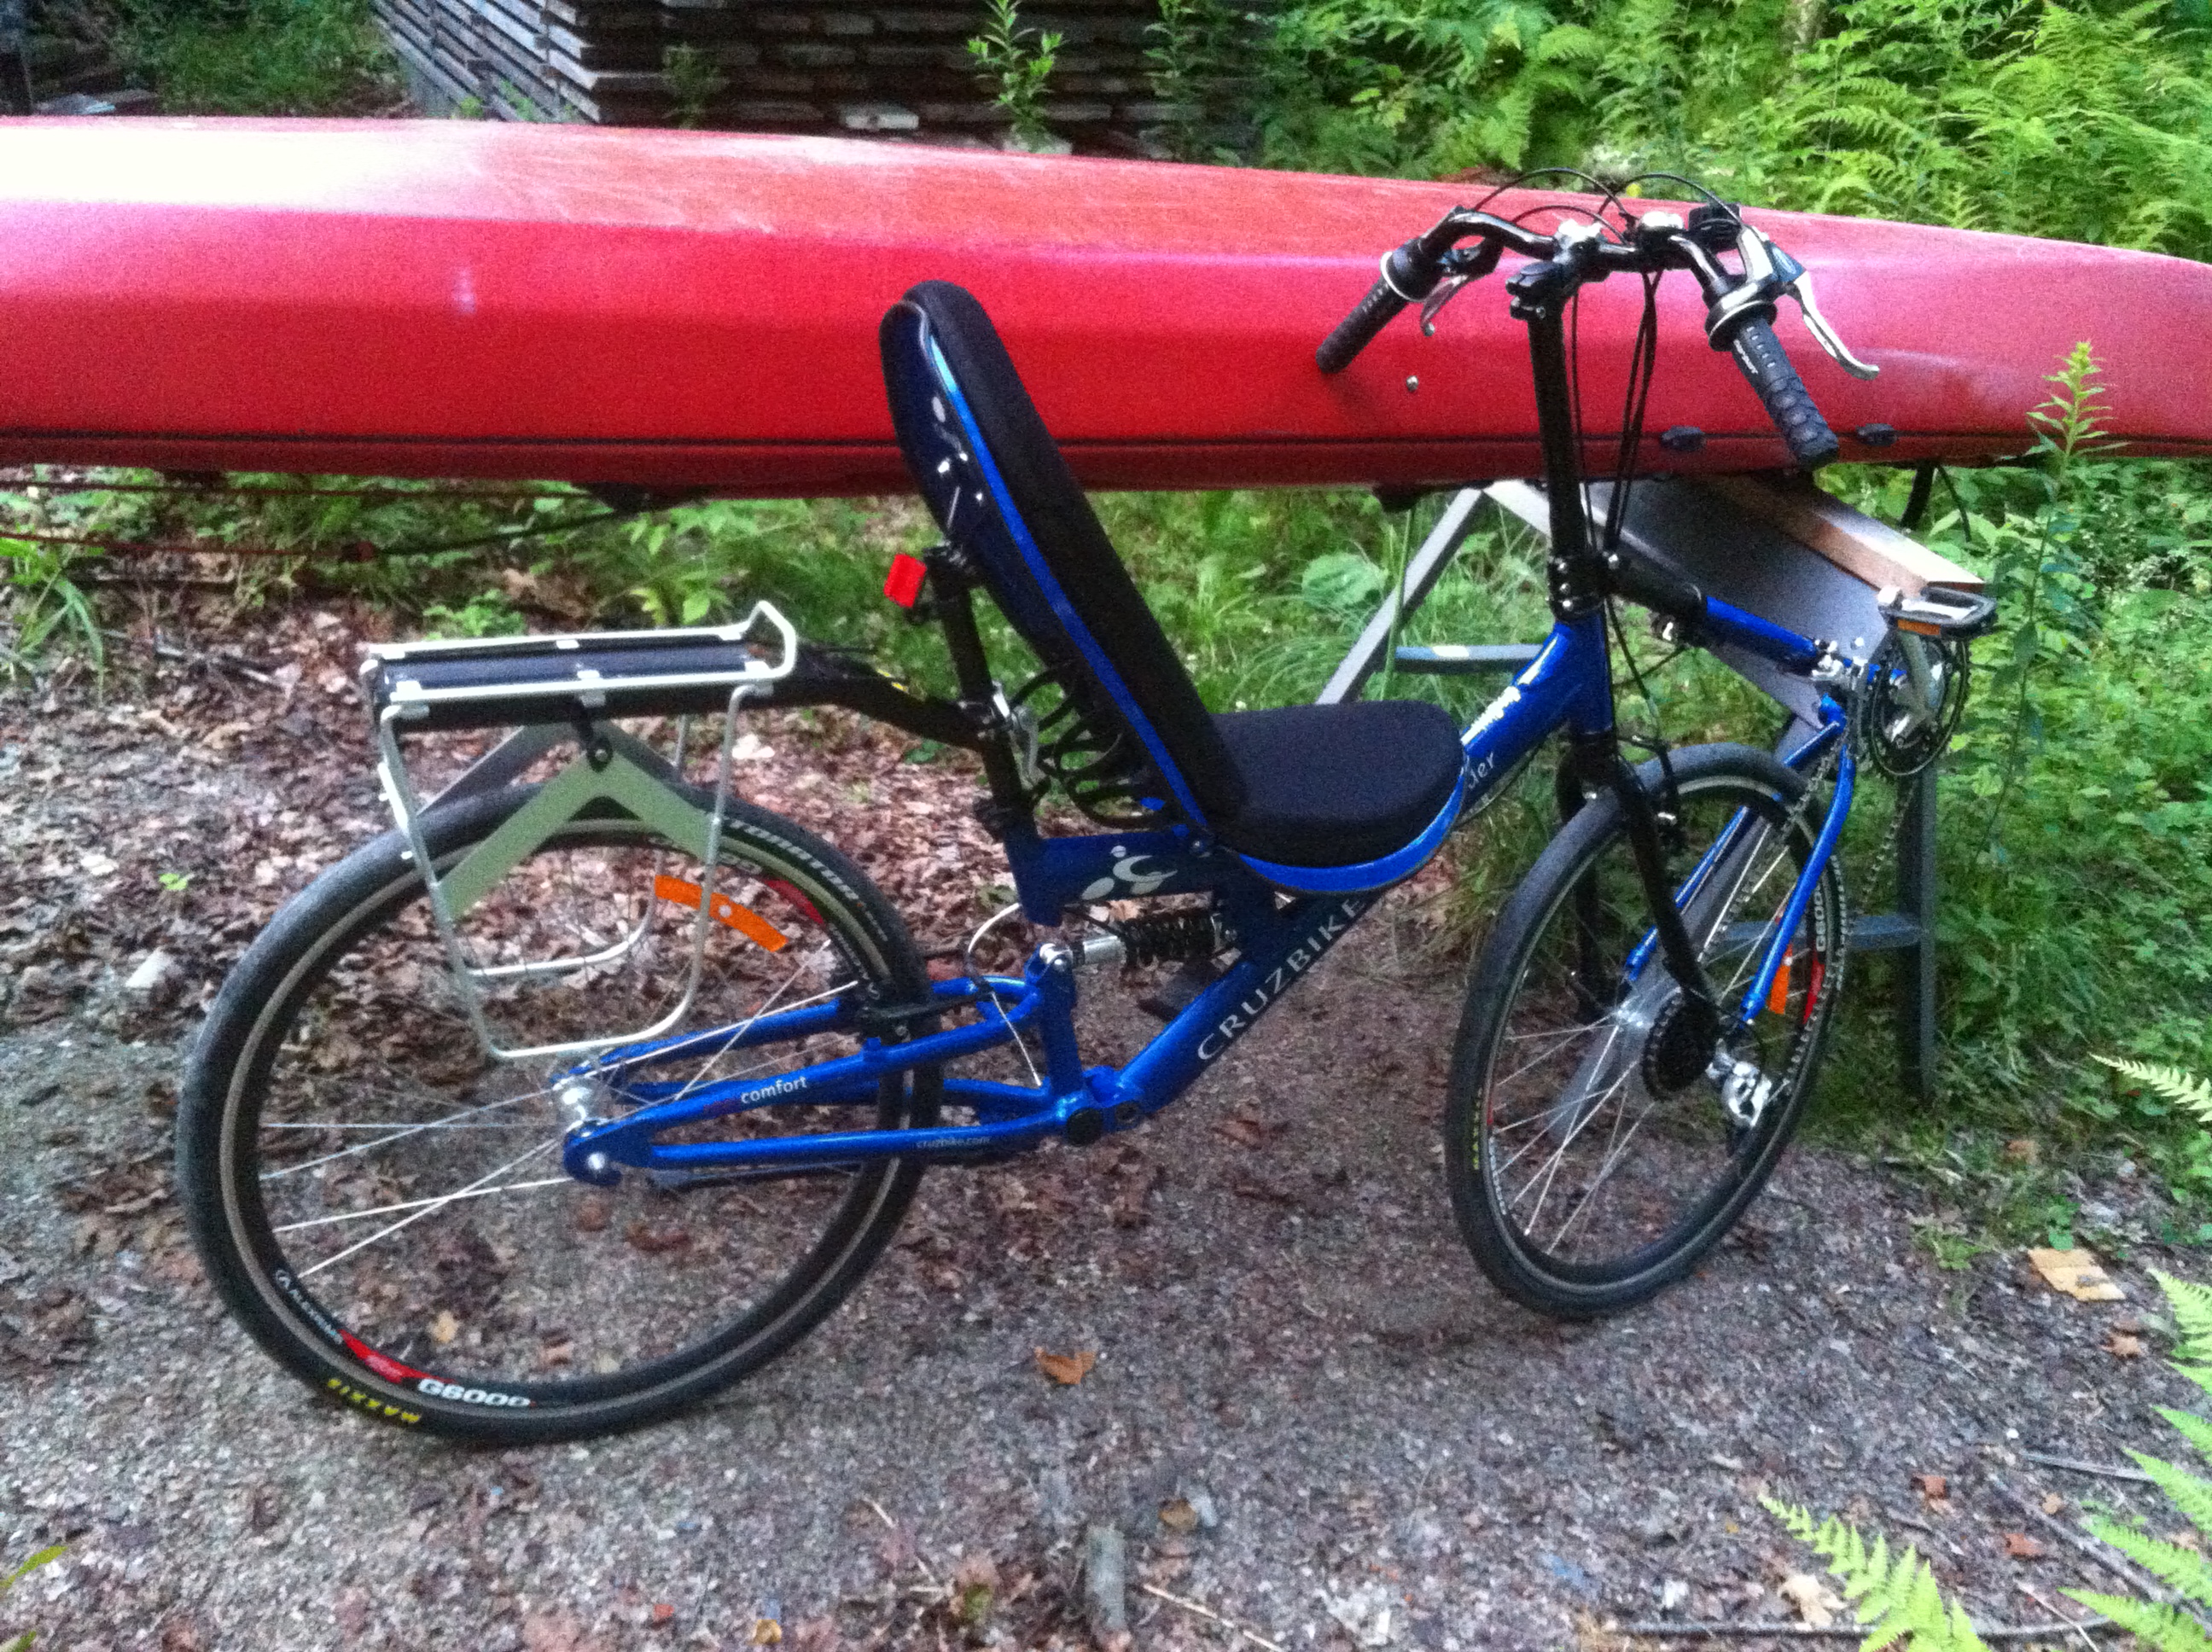
The Finished Product
Day 2: Fine Tuning and Gaining Proficiency
I spent the afternoon today tinkering and practicing. Since the roads around my house are all gravel and hilly, I decided to drive my Sofrider into Montpelier to practice. I learned that it fits inside my Subaru with the front wheel removed. It unfortunately does not fit on my Rocky Mounts TieRod roof rack though I also have a Rocky Mounts Pitchfork which doesn’t fit on my current car, but it looks like the SofRider would mount on that one.
I started on the Montpelier bike path near the Hunger Mountain Coop where there is a long flat straight-away. I cruised back and forth several times before heading all the way down to the far end of the path. I swung through the large empty parking lot of the Train Depot and did about a dozen large figure 8’s, which was super helpful for getting comfortable with turns. I was still a little wobbly and nervous around cars, especially when I’m just starting to pedal, but it’s getting way easier. On the way back I even ended up managing a big loop through down-town traffic to swing by Onion River Sports and buy an Odometer. I’m certainly not quite up for a tour yet, but I’m feeling more and more comfortable with each mile I ride!
Problems/Complaints/Challenges:
The rear rack that they sell for it is the Topeak MTX BeamRack Type A. It says it is rated to 25 lbs, however I’m a little concerned about it and considering returning it. I find even with it at the top of my seat post with NO weight on it at all when I’m going up hill or really leaning back hard on my seat the rear shock compresses and the underside of the rack touches the tire. If this happens with no weight, it’ll be even worse with 25 lbs of gear on the rack. I’ll make a few more adjustments and test it out with panniers next week, but my guess is this rack just won’t cut it.
The Head Set! The headset works differently than a normal bikes headset and installing or adjusting it (according to the official directions) is done with a hammer! I’m sure there is something I’m not doing quite right, but no matter how tight I seem to get it, it jiggles loose within a few miles of bumpy road. Next time I have a chunk of time I’m going to completely disassemble the steering column and start over on it, but so far that is my one big mechanical complaint. Hoping I can get it to stay tight!
If I decide to Tour on this bike, I will probably want to invest in upgrading the front to a triple instead of a double to give myself a better Granny Gear. So far I’ve made it up most hills but its a bit of a struggle and I have not yet been able to make it up Random Road (the road I live on!) The shifter is designed to allow for this upgrade and I think it’s not too hard to do – I really wish they offered that as an option to begin with!
While many reviews mention that going up steep hills the front wheel has the tendency to spin out, I’ve only had trouble with that if the road has really loose sand or gravel on it. I find I can mostly mitigate this problem by leaning way forward and trying to add weight to the front wheel.
The Bottom Line:
I love it. I’m going to keep it and get good at it and it’s going to be a lot of fun. I have a feeling that if I decide to deck it out as my main touring bike, I’ll probably eventually want to sell it and invest in a Quest, the next model up. The Quest has disc brakes and just a general better set up for touring – but that’s a few years and hopefully many many happy miles down the road! In the meantime, I’ll probably make a few after-market adjustments to get it just where I like it. So far all I’ve added are the two bottle cages that came with it to the seat back, as well as a third cage mounted on the steering column so I can reach it while riding. The steering column is long enough I should be able to mount another cage lower on it, as I like to have 4 water bottles on my bikes. Still working on gear storage, I want to test the rack with some light panniers but I’m also working on coming up with a creative way to stow dual 20L dry bags hanging from the underside of the seat. I’ll do a separate post in a few weeks once I have more miles and made more alterations to my setup.
Happy Trails!

Pingback: prepping – 7_24_2014 | Headline News
Interesting design, the back part looks like my mountain bike (without pedals), but the overall look is similar to my recumbent. Mine is rear drive with the long chain and under seat steering. I can imagine pedaling hard effects steering on yours, but you can see both derailleurs on yours. I can only see the front. Getting started was “different” the low speed turns were the worst, my bike has the “scars” to prove it. When I started to fall over I was too close to the ground to stop it
yeah its been a challenge getting going. I (miraculously) never actually fully dumped it, though I cruised off into the bushes more than once and it took me most of an hour before I could do multiple consecutive pedal strokes without putting a foot down. I have my seat positioned upright enough so I can put a foot down without too much trouble, though I may lay it flatter once I’m more comfortable on it.
the front wheel drive seems to not bother me too much anymore of the flats, but it still has me twisting and turning all over the place going up hill, and my first few pedal strokes each time I start out. Certainly still have some getting used to to do!